# 常用工具和插件
# VSCode 常用插件
- Git History: 查看 git 历史
- Leetcode:刷题必备
- Bracket Pair Colorizer:括号匹配
- GitLens:在 vscode 上使用 git 功能
- Chinese (Simplified) Language Pack for Visual Studio Code:中文设置
安装后,在
locale.json中添加"locale": "zh-cn",即可载入中文(简体)语言包。要修改locale.json,你可以同时按下Ctrl+Shift+P打开命令面板,之后输入 "config" 筛选可用命令列表,最后选择配置语言命令。
- Babel JavaScript:JavaScript 语法高亮显示
- ESLint
- Live Server
- open in browser
- Minapp:微信小程序标签、属性的智能补全
- wechat-snippet:微信小程序代码辅助
- wxml:微信小程序 wxml 格式化以及高亮组件
- Vetur: 支持vue文件的语法高亮显示,除了支持template模板以外,还支持大多数主流的前端开发脚本和插件,比如Sass和TypeScript
- vscode-icons
- vue-helper插件:代码提示,函数跳转
- Codelf:右键变量命名
- any-rule:正则大全
- es6-string-html:模板字符串高亮
- 模板字符串闭合 (opens new window)
- 自动补全 (opens new window)
# vue-dev-tools
控制台调试 vue,安装 (opens new window)
# Jsonview
https://github.com/gildas-lormeau/JSONView-for-Chrome
# Iterm2 + oh my zsh
iTerm2 + Oh My Zsh 打造舒适终端体验 (opens new window)
其中字体包等资源github访问慢可以去gitee上找
oh my zsh命令提示功能 (opens new window),提示颜色在 perference / profiles / color / ANSI Colors / Bright设置
# nvm和n
安装node:brew install node
管理node版本工具:nvm (opens new window)或者n (opens new window),我比较喜欢用n
# homebrew
Homebrew (opens new window)是一款自由及开放源代码的软件包管理系统,用以简化macOS系统上的软件安装过程。对于Appstore中没有的软件,推荐使用此方法安装管理第三方软件。
# tree
安装:brew install tree
使用:tree -a
# npm, cnpm, yarn,tyarn
下载完 node 就自动有了 npm
npm install -g cnpm --registry=https://registry.npm.taobao.org
cnpm i -g yarn
# 同时配置github和gitlab
生成公钥:ssh-keygen -t rsa -C 915397405@qq.com -f ~/.ssh/id_rsa_github
进入 ssh 配置目录:cd ~/.ssh
配置文件生效:sudo source config
git配置github与gitlab同时使用 (opens new window)
# gitlab
Host icode
  HostName gitlab.com
  PreferredAuthentications publickey
  IdentityFile ~/.ssh/id_rsa

# github
Host github
  HostName github.com
  User 915397405@qq.com
  PreferredAuthentications publickey
  IdentityFile ~/.ssh/id_rsa_github
如果出现了 git@github.com: Permission denied (publickey).
可以进入ssh目录运行下ssh-add id_rsa_github试试
如果出现以下错误:Bad owner or permissions on .ssh/config
这个时候,只需要在.ssh目录,执行以下命令行:sudo chmod 600 config
kex_exchange_identification: Connection closed by remote host
fatal: Could not read from remote repository.

Please make sure you have the correct access rights
and the repository exists.
则配置下 hosts 中的 github ip 地址即可
@@@@@@@@@@@@@@@@@@@@@@@@@@@@@@@@@@@@@@@@@@@@@@@@@@@@@@@@@@@
@    WARNING: REMOTE HOST IDENTIFICATION HAS CHANGED!     @
@@@@@@@@@@@@@@@@@@@@@@@@@@@@@@@@@@@@@@@@@@@@@@@@@@@@@@@@@@@
IT IS POSSIBLE THAT SOMEONE IS DOING SOMETHING NASTY!
Someone could be eavesdropping on you right now (man-in-the-middle attack)!

// 删除下 know_hosts 重新 push
ssh-keygen -R github.com
Unable to negotiate with xx.xx.xx.xx port xxxx: no matching host key type found. Their offer: ssh-rsa
fatal: Could not read from remote repository.

Please make sure you have the correct access rights
and the repository exists.

// config 中增加配置
Host *
HostkeyAlgorithms +ssh-rsa
PubkeyAcceptedKeyTypes +ssh-rsa
# github访问慢
解决GitHub下载速度太慢问题 (opens new window)
# carbon
https://carbon.now.sh/
# github部署
项目中新建脚本 scripts/deploy-gh.sh
# 确保脚本抛出遇到的错误
set -e

# 生成静态文件
npm run build

# 进入生成的文件夹
cd dist

# git 命令
git init
git add .
git commit -m 'deploy'

# 发布: git push -f git@github.com:<USERNAME>/<REPO>.git master:gh-pages
git push -f git@github.com:jinjingxuan/san-admin.git master:gh-pages

# 返回上一次的工作目录
cd -
package.json中:
"scripts": {
  "deploy-gh": "bash scripts/deploy-gh.sh"
}
# tmux
开发机常用
http://www.ruanyifeng.com/blog/2019/10/tmux.html
# 绘图工具
https://excalidraw.com/
# charles

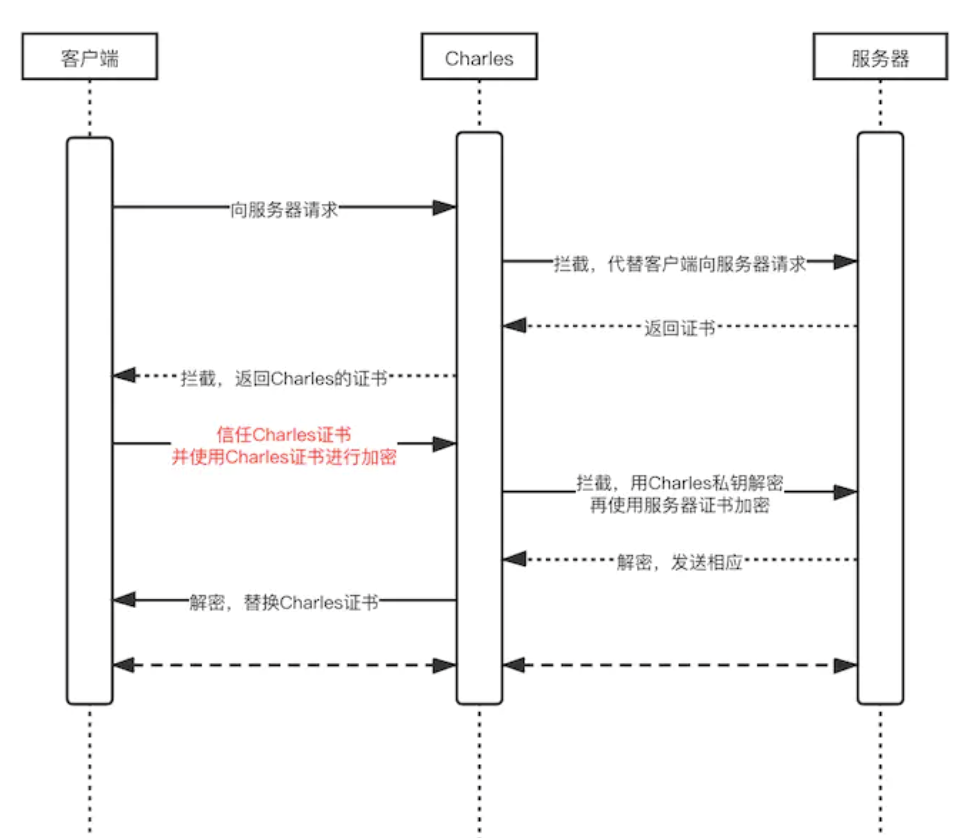
charles 相当于插在服务器和客户端之间的过滤器,当客户端向服务器发起请求的时候,先到 charles 进行过滤,然后 charles 在把最终的数据发送给服务器。服务器接收请求后的返回数据,也会先到 charles,经过 charles 过滤后再发给客户端。charles 发给服务器的数据,不一定是客户端请求的数据,charles 在接到客户端的请求时可以自由的修改数据。同理:客户端接收的数据,不一定就是服务器返回的数据,而是 charles 给的数据。(类似中间人攻击)
官网:https://www.charlesproxy.com/
破解:https://www.zzzmode.com/mytools/charles/
# 如何使用 charles 抓包(APP)
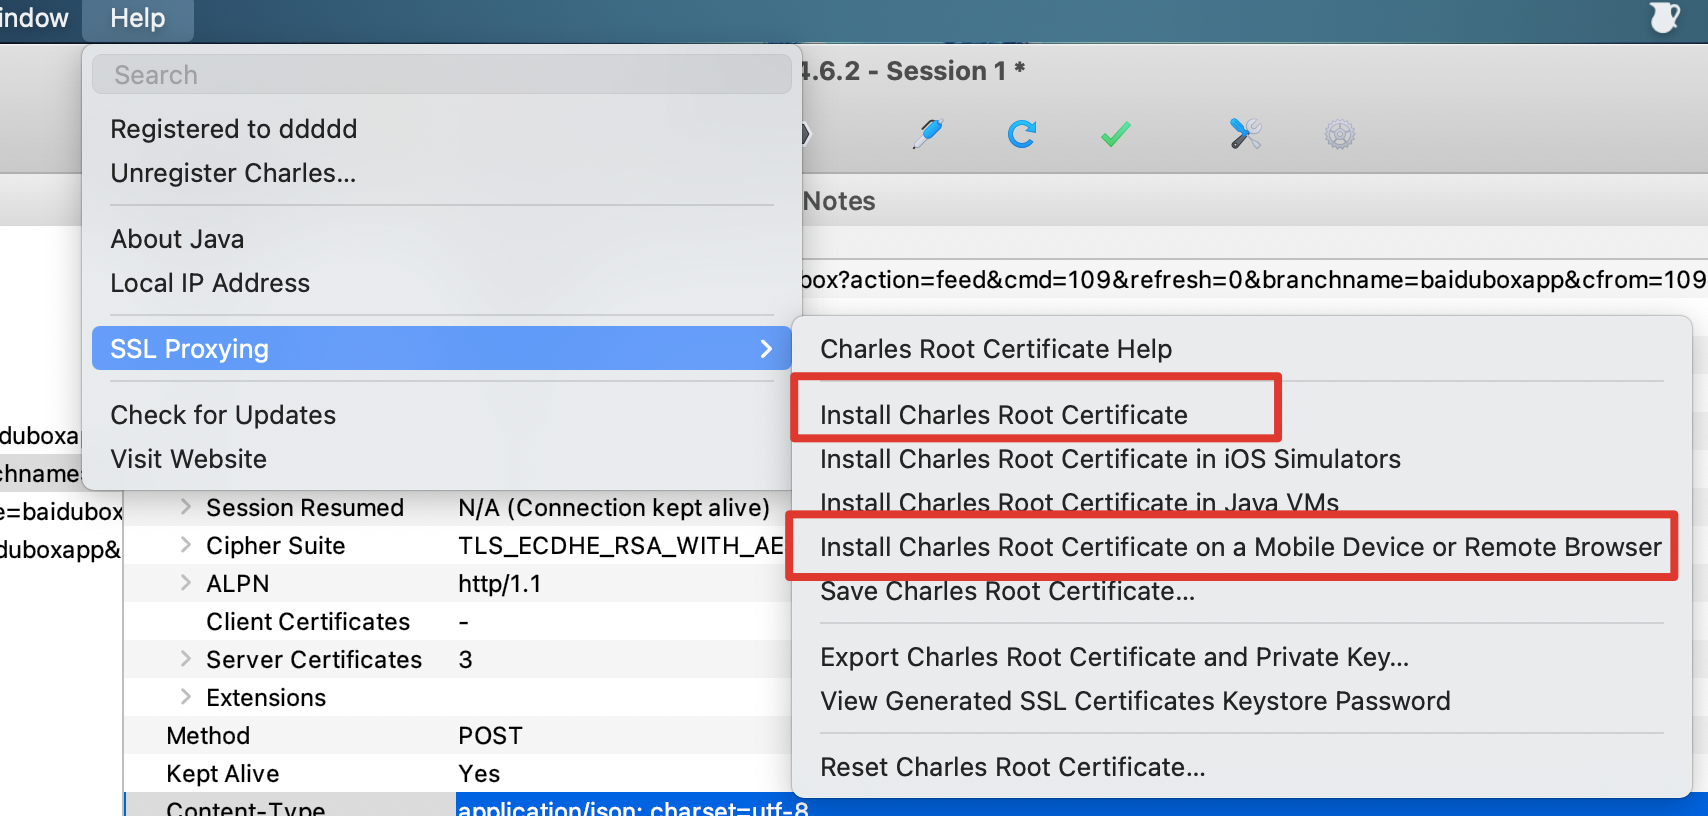
- 点击顶部菜单栏【Help】-->选择【SSL Proxying】,点击【install Charles Root Certificate】在 mac 上安装 Charles 根证书即可; 点击安装【Install Charles Root Certificate On a Mobile Device or Remote Browser】在移动设备上或远程浏览器安装证书;

- 保证手机和 mac 在同一局域网内,wifi 配置手动代理(按 charles 给出的 ip 和 端口号),然后访问
chls.pro/ssl下载证书,然后通用 -> 关于本机 -> 证书信任设置中选中 Charles 的证书

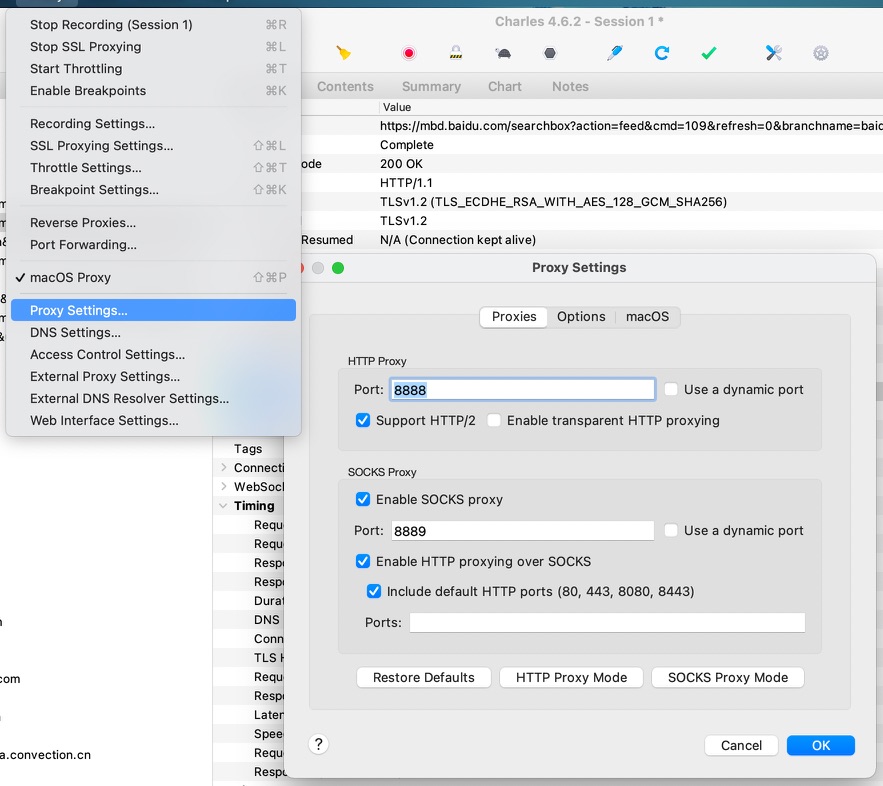
- 检查下 charles proxy setting

- 接下来就可以抓包了,如果出现红叉以下情况,可能是证书过期了。【Help】-->【SSL Proxying】--> 【Reset Charles Root Certificate】重置证书,手机上也把之前下载好的证书卸载掉,按照以上步骤重新安装。

# nodemon
nodemon是一种工具,可以自动检测到目录中的文件更改时通过重新启动应用程序来调试基于node.js的应用程序。
npm install -g nodemon
# helm
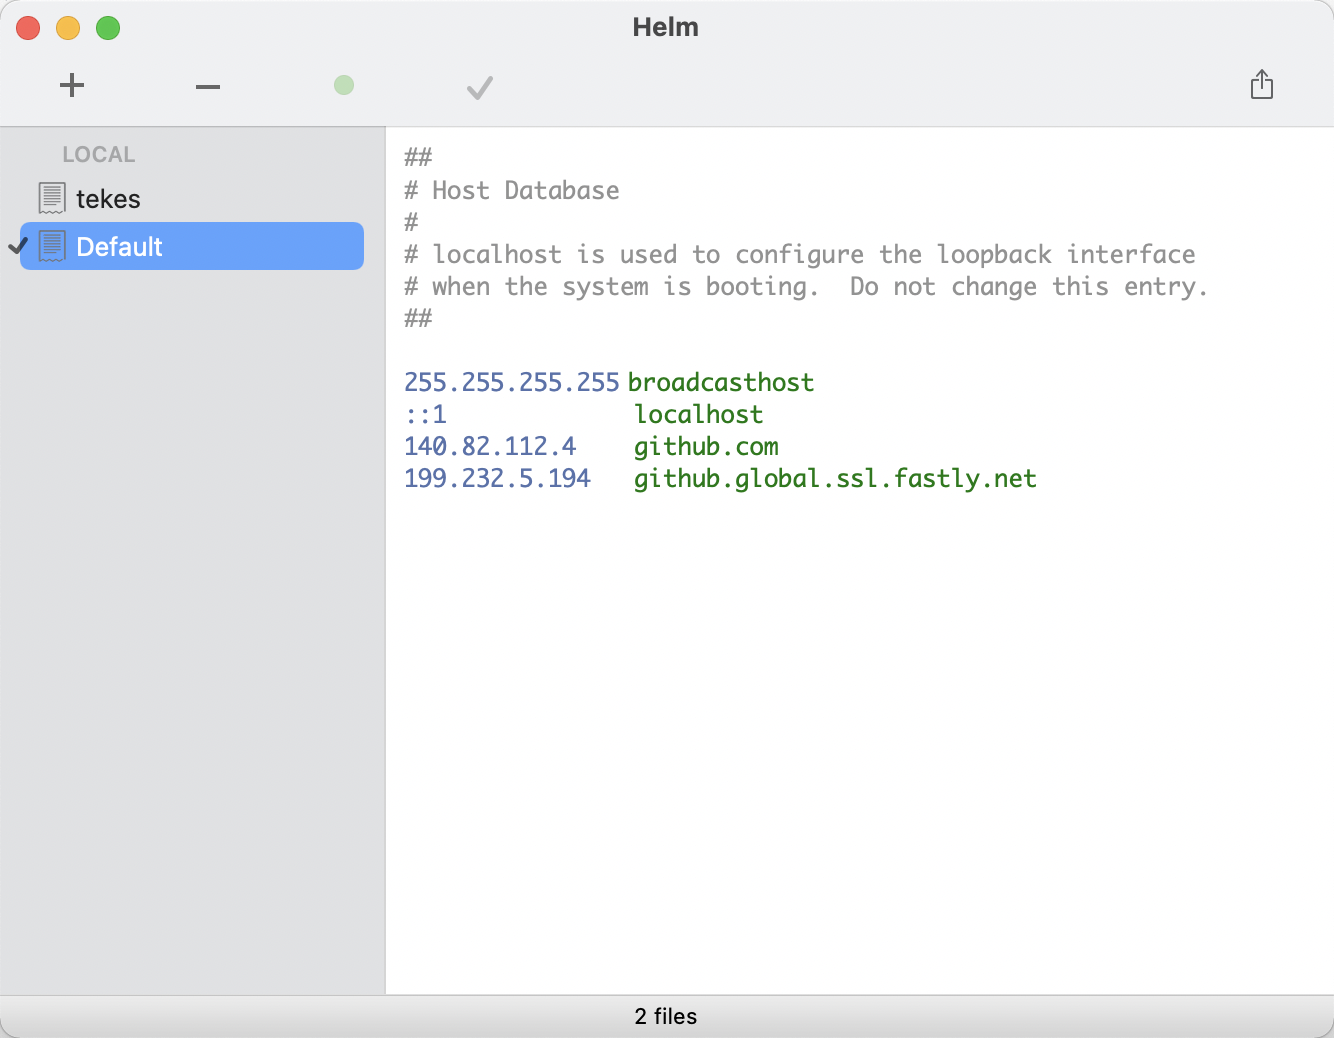
Mac 上修改 host 文件的工具,Appstore中就能下载。可以建多份配置文件来回切换。

# ipic
图床工具,Appstore中就能下载。
# Mac 软件
https://www.macwk.com/
# github cli
当我们将本地代码提交到 GitHub 后,就可以在 GitHub 网站上查看到各种的交互信息了,例如其它开发者提的 Issue,或者提交的代码合并请求等。但是,如果我们能在命令行上直接查看、处理这些信息,那么就有了 github cli
官网:https://cli.github.com/
安装:brew install gh
更新:brew update && brew upgrade gh
授权登录:gh auth login(通过命令行交互会调起浏览器 github 进行授权)
查看 issue 列表:gh issue list
切换到 pr 分支:gh pr checkout 111
# JSDoc
js注释工具:https://www.jsdoc.com.cn/
# HomeBrew 清华镜像
https://mirrors.tuna.tsinghua.edu.cn/help/homebrew/ (opens new window)
brew 安装 php:https://stackoverflow.com/questions/70417377/error-php7-3-has-been-disabled-because-it-is-a-versioned-formula、https://github.com/shivammathur/homebrew-php/discussions/743
# python
在跑项目时报了这个错:
"Can't find Python executable "python", you can set the PYTHON env variable."
问题是找不到 python 命令,然而我的电脑中装了 python3,输入 python3 ok 但是输入 python 时确实没有。于是按照stackoverflow (opens new window)解决了下。
pyenv 是Python 版本管理工具。 pyenv 可以改变全局的Python 版本,在系统中安装多个版本的Python
npm ERR! gyp info it worked if it ends with ok npm ERR! gyp info using node-gyp@3.8.0 npm ERR! gyp info using node@16.0.0 | darwin | x64 npm ERR! gyp ERR! configure error npm ERR! gyp ERR! stack Error: Command failed: /Users/jinjingxuan/.pyenv/shims/python -c import sys; print "%s.%s.%s" % sys.version_info[:3]; npm ERR! gyp ERR! stack File "
", line 1 npm ERR! gyp ERR! stack import sys; print "%s.%s.%s" % sys.version_info[:3];
原因一般是本机安装了python3,但依赖的脚本有python2的
# 查看可安装 Python 版本
使用如下命令查看可安装版本
$ pyenv install -l
$ pyenv install 2.7.3   # 安装 python
$ pyenv uninstall 2.7.3 # 卸载 python
$ pyenv global 2.7.3  # 设置全局的 Python 版本,通过将版本号写入 ~/.pyenv/version 文件的方式。
$ pyenv local 2.7.3 # 设置 Python 本地版本,通过将版本号写入当前目录下的 .python-version 文件的方式。通过这种方式设置的 Python 版本优先级较 global 高。
还遇到了这个问题
BUILD FAILED (OS X 13.4 using python-build 20180424)
# 最后这样安装成功了
brew intall gcc
CC=/usr/bin/gcc pyenv install 2.7.18