# 1. React 介绍
React 是一个用于构建用户界面的 JavaScript 库,它只负责应用的视图层,帮助开发人员构建快速且交互式的 web 应用程序。
React 使用组件的方式构建用户界面。
# 2. JSX 语法
它是一种 JavaScript 语法的扩展,React 使用它来描述用户界面长成什么样子。在 React 代码执行之前,Babel 会对将 JSX 编译为 React API。React.createElement会返回Virtual DOM,然后再转换为真实DOM
<!-- JSX -->
<div className="container">
  <h3>Hello React</h3>
  <p>React is great </p>
</div>
// Babel 会对将 JSX 编译为 React API
React.createElement(
  "div",
  {
    className: "container"
  },
  React.createElement("h3", null, "Hello React"), // 三个参数,标签,属性,内容
  React.createElement("p", null, "React is great")
);
// 返回对应的 Virtual DOM,三个属性type, props, children
{
  type: "div",
  props: { className: "container" },
  children: [
    {
      type: "h3",
      props: null,
      children: [
        {
          type: "text",
          props: {
            textContent: "Hello React"
          }
        }
      ]
    },
    {
      type: "p",
      props: null,
      children: [
        {
          type: "text",
          props: {
            textContent: "React is great"
          }
        }
      ]
    }
  ]
}
从两种语法对比来看,JSX 语法的出现是为了让 React 开发人员编写用户界面代码更加轻松。
# 2.1 在 JSX 中使用表达式
const user = {
  firstName: 'Harper',
  lastName: 'Perez'
}
function formatName(user) {
  return user.firstName + ' ' + user.lastName;
}
const element = <h1>Hello, {formatName(user)}!</h1>;
JSX 本身其实也是一种表达式,将它赋值给变量,当作参数传入,作为返回值都可以。
function getGreeting(user) {
  if (user) {
    return <h1>Hello, {formatName(user)}!</h1>;
  }
  return <h1>Hello, Stranger.</h1>;
}
# 2.2 属性
如果属性值为字符串类型,需要加引号,属性名称推荐采用驼峰式命名法。
const element = <div greeting="hello"></div>;
如果属性值为JavaScript表达式,属性值外面加大括号。
const element = <img src={user.avatarUrl} />;
// 注意大括号外面不能加引号,JSX 会将引号当中的内容识别为字符串而不是表达式
# 2.3 JSX 单标记必须闭合
如果 JSX 是单标记,必须闭合,否则报错。
const element = <img src={user.avatarUrl} />
const element = <input type="text"/>
# 2.4 className
为 JSX 标记添加类名需要使用 className,而不是class。
const element = <img src={user.avatarUrl} className="rounded"/>;
# 2.5 JSX 自动展开数组
const ary = [<p>哈哈</p>, <p>呵呵</p>, <p>嘿嘿</p>];
const element = (
	<div>{ary}</div>
);
// 解析后
/*
	<div>
		<p>哈哈</p>
		<p>呵呵</p>
		<p>嘿嘿</p>
	</div>
*/
# 2.6 三元运算
{ boolean ? <div>Hello React</div> : null }
{ boolean && <div>Hello React</div> }
# 2.7 循环
const persons = [{
  id: 1,
  name: '张三',
  age: 20
}, {
  id: 2,
  name: '李四',
  age: 15
}, {
  id: 3,
  name: '王五',
  age: 22
}]
<ul>
  { persons.map(person => <li key={person.id}> {person.name} {person.age} </li>) }
</ul>
# 2.8 事件
{/* 第一个参数即是事件对象 不需传递 */}
<button onClick={this.eventHandler}>按钮</button>
{/* 需要传递事件对象 */}
<button onClick={e=>this.eventHandler('arg',e)}>按钮</button>
{/* 最后一个参数即是事件对象 不需传递 */}
<button onClick={this.eventHandler.bind(this, 'arg')}>按钮</button>
constructor () {
  this.eventHandler = this.eventHandler.bind(this)
}
eventHandler () {}
<button onClick={this.eventHandler}>按钮</button>
React事件处理函数必须使用bind(this)的原因 (opens new window)
// 上面链接中的例子详解
export default class Demo extends React.Component{
    constructor(props){
        super(props);
        this.state = {
            count:4
        };
    }
    render(){
        return (
            <div>
                <button onClick={this.handleAdd}>点击一下</button>
                <button onClick={this.handleClick.bind(this)}>点击一下</button>
                <p>{this.state.count}</p>
            </div>
        )
    }
    // 要么使用箭头函数 此时 this 指向是当前实例对象
    handleAdd = () => {
        console.log(this)
        this.setState({
            count:5
        })
    }
    // 要么使用普通函数,但是需要 bind(this)
    handleClick() {
        console.log(this)
        this.setState({
            count:6
        })
    }
}
# 2.9 样式
# 2.9.1 行内样式
class App extends Component {
  render() {
    const style = {width: 200, height: 200, backgroundColor: 'red'};
    return <div style={style}></div>
  }
}
# 2.9.2 外链样式
// Button.js
import styles from './Button.module.css';
class Button extends Component {
  render() {
    return <button className={styles.error}>Error Button</button>;
  }
}
# 2.9.3 全局样式
import './styles.css'
# 2.10 ref 属性
# 2.10.1 createRef
class Input extends Component {
  constructor() {
    super()
    this.inputRef = React.createRef()
  }
  render() {
    return (
      <div>
        <input type="text" ref={this.inputRef} />
        <button onClick={() => console.log(this.inputRef.current)}> button </button>
      </div>
    )
  }
}
# 2.10.2 函数参数
// 参数input指向当前节点
class Input extends Component {
  render() {
    return (
      <div>
        <input type="text" ref={input => (this.input = input)} />
        <button onClick={() => console.log(this.input)}>button</button>
      </div>
    )
  }
}
# 2.10.3 ref 字符串
不推荐使用,在严格模式下报错。
class Input extends Component {
  render() {
    return (
      <div>
        <input type="text" ref="username" />
        <button onClick={() => console.log(this.refs.username)}>button</button>
      </div>
    )
  }
}
# 2.10.4 获取组件实例
点击按钮让 input 文本框获取焦点。
input 文本框以及让文本框获取焦点的方法定义在 Input 组件中,在 App 组件中引入 Input 组件,按钮定义在 App 组件中。
// Input.js
class Input extends Component {
  constructor() {
    super()
    this.inputRef = React.createRef()
    this.focusInput = this.focusInput.bind(this)
  }
  focusInput() {
    this.inputRef.current.focus()
  }
  render() {
    return (
      <div>
        <input type="text" ref={this.inputRef} />
      </div>
    )
  }
}
// App.js
class App extends Component {
  constructor() {
    super()
    this.InputComponentRef = React.createRef()
  }
  render() {
    return (
      <div className="App">
        <Input ref={this.InputComponentRef} />
        <button onClick={() => this.InputComponentRef.current.focusInput()}>button</button>
      </div>
    )
}
# 2.11 括号
return 后面带着一个圆括号,只是为了换行显示,也可以是中括号[]。不使用括号不能换行。
// ok
const Person = () => {
	return <div>
    	hello world;
    </div>
}

// ok
const Person = () => {
	return (
  	<div>
    	hello world;
    </div>
  );
}

// ok
const Person = () => {
	return [
    <div>
    	hello world;
    </div>
  ];
}

// error
const Person = () => {
	return
    <div>
    	hello world;
    </div>
}
# 3. 组件
# 3.1 什么是组件
React 是基于组件的方式进行用户界面开发的. 组件可以理解为对页面中某一块区域的封装。
# 3.2 创建组件
# 3.2.1 创建类组件
import React, { Component } from 'react';
class App extends Component {
    render () {
        return <div>Hello, 我是类组件</div>
    }
}
// render函数会转换成 React.createElement,所以需要引入 React
# 3.2.2 创建函数组件
const Person = () => {
     return <div>Hello, 我是函数型组件</div>;
}
注意事项
- 组件名称首字母必须大写,用以区分组件和普通标签。
- jsx语法外层必须有一个根元素
# 3.3 组件 props
# 3.3.1 props 传递数据
在调用组件时可以向组件内部传递数据,在组件中可以通过 props 对象获取外部传递进来的数据。
<Person name="乔治" age="20"/>
<Person name="玛丽" age="10"/>
// 类组件
class Person extends Component {
  render() {
    return (
      <div>
        <h3>姓名:{this.props.name}</h3>
        <h4>年龄:{this.props.age}</h4>
      </div>
    );
  }
}
// 函数组件
const Person = props => {
  return (
    <div>
      <h3>姓名:{props.name}</h3>
      <h4>年龄:{props.age}</h4>
    </div>
  );
}
注意:
- props 对象中存储的数据是只读的,不能在组件内部被修改。
- 当 props 数据源中的数据被修改后,组件中的接收到的 props 数据会被同步更新。( 数据驱动DOM )
- 类组件render函数的this指向组件实例对象,function函数组件中的this是undefined
# 3.3.2 设置 props 默认值
class App extends Component {
    static defaultProps = {}
}
function ThemedButton(props) {
}
ThemedButton.defaultProps = {
  theme: "secondary",
  label: "Button Text"
};
# 3.3.3 组件 children
通过 props.children 属性可以获取到在调用组件时填充到组件标签内部的内容。
<Person>组件内部的内容</Person>
const Person = (props) => {
    return (
    	<div>{props.children}</div>
    );
}
# 3.3.4 单向数据流
在React中, 关于数据流动有一条原则, 就是单向数据流动, 自顶向下, 从父组件到子组件.
单向数据流特性要求我们共享数据要放置在上层组件中.
子组件通过调用父组件传递过来的方法更改数据.
当数据发生更改时, React会重新渲染组件树.
单向数据流使组件之间的数据流动变得可预测. 使得定位程序错误变得简单.
# 3.4 类组件状态 state
# 3.4.1 定义组件状态
类组件除了能够从外部 (props) 接收状态数据以外还可以拥有自己的状态 (state),此状态在组件内部可以被更新,状态更新 DOM 更新。
组件内部的状态数据被存储在组件类中的 state 属性中,state 属性值为对象类型,属性名称固定不可更改。
class App extends Component {
  constructor () {
    super()
    this.state = {
      person: { name: '张三', age: 20 },
    }
  }
  render () {
    return (
      <div>
        {this.state.person.name}
        {this.state.person.age}
      </div>
    );
  }
}
# 3.4.2 更改组件状态
state 状态对象中的数据不可直接更改,如果直接更改 DOM 不会被更新,要更改 state 状态数据需要使用 setState方法。
class App extends Component {
  constructor () {
    this.state = {
      person: { name: '张三', age: 20 },
    }
    this.changePerson = this.changePerson.bind(this)
  }
	changePerson () {
    this.setState({
      person: {
        name: '李四',
        age: 15
      }
    })
  }
  render() {
    return (
      <div>
        {this.state.person.name}
        {this.state.person.age}
        <button onClick={this.changePerson}>按钮</button>
      </div>
    );
  }
}
# 3.4.3 双向数据绑定
双向数据绑定是指,组件类中更新了状态,DOM 状态同步更新,DOM 更改了状态,组件类中同步更新。组件 <=> 视图。
要实现双向数据绑定需要用到表单元素和 state 状态对象。
class App extends Component {
  constructor () {
    this.state = {
      name: "张三"
    }
    this.nameChanged = this.nameChanged.bind(this)
  }
  nameChanged (event) {
    this.setState({name: event.target.value});
  }
  render() {
    return (
      <div>
        <div>{this.state.name}</div>
        <Person name={this.state.name} changed={this.nameChanged}/>
      </div>
    )
  }
}
const Person = props => {
	return <input type="text" value={props.name} onChange={props.changed}/>;
}
# 3.5 类组件生命周期函数
在组件完成更新之前需要做某种逻辑或者计算,就需要用到快照
componentDidUpdate(prevProps, prevState, snapshot) {}
getSnapshotBeforeUpdate 方法会在组件完成更新之前执行,用于执行某种逻辑或计算,返回值可以在 componentDidUpdate 方法中的第三个参数中获取,就是说在组件更新之后可以拿到这个值再去做其他事情。
getSnapshotBeforeUpdate(prevProps, prevState) {
  return 'snapshot'
}
# 3.6 Context
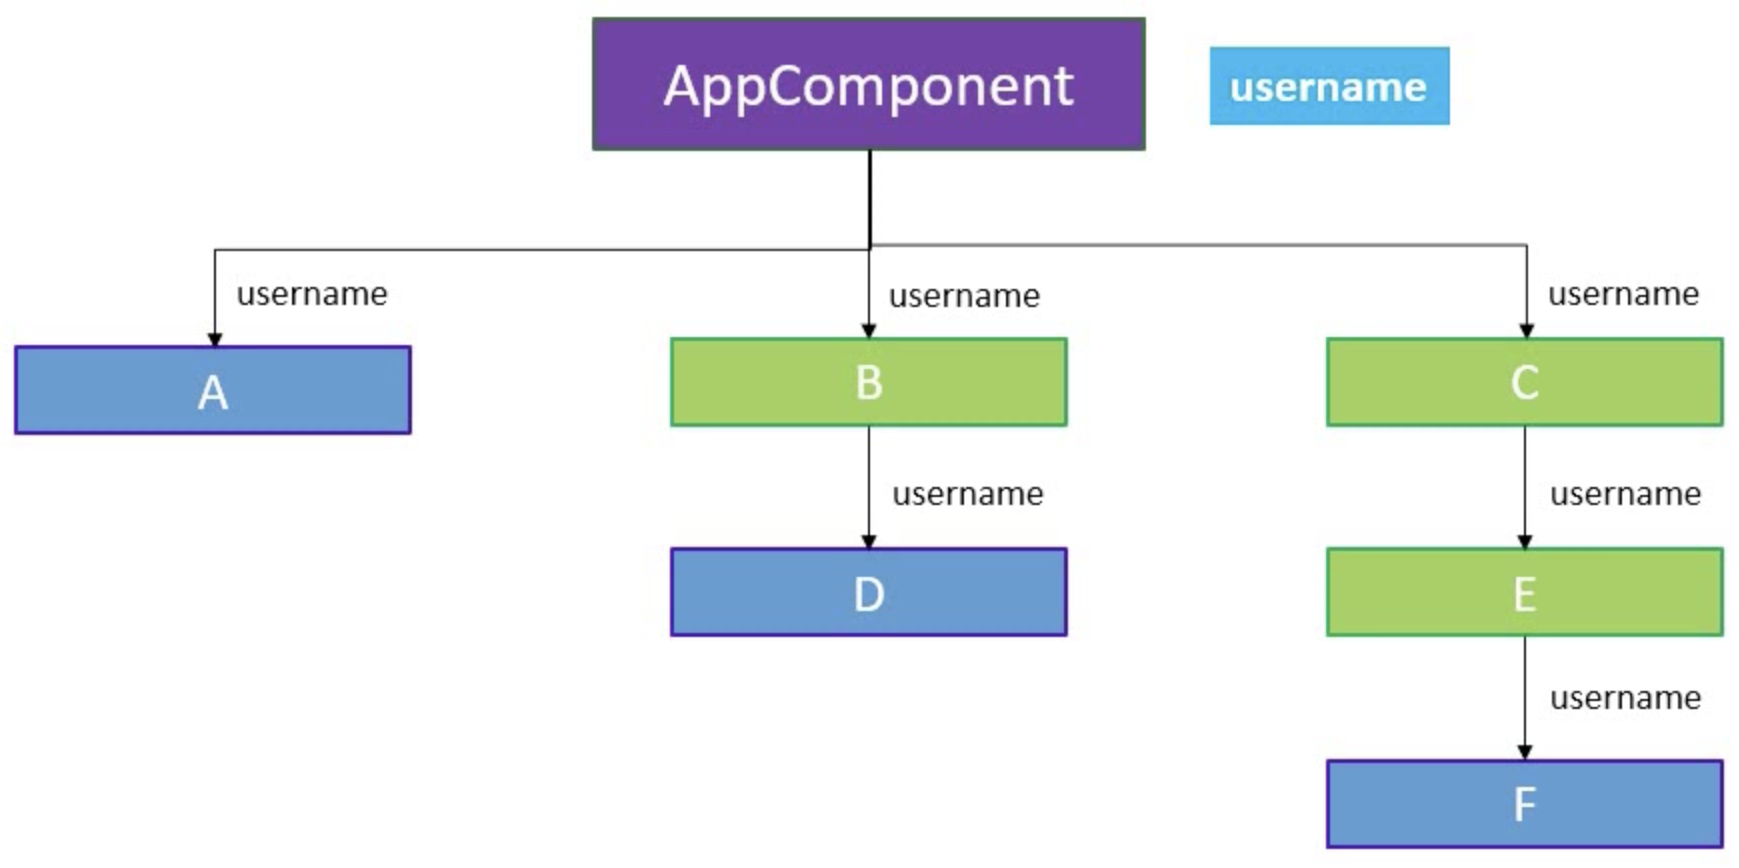
通过 Context 可以跨层级传递数据
// userContext.js
import React from "react"

const { Provider, Consumer } = React.createContext(defaultValue)

export { Provider, Consumer }
// App.js
import { Provider } from "./userContext"
class App extends Component {
  render() {
    return (
      <Provider value="Hello React Context(这是共享的数据)">
        /*里面可以渲染对应的内容*/
      </Provider>
    )
  }
}
// C.js
import { Consumer } from "./userContext"

export class C extends Component {
  render() {
    return (
      <div>
        <Consumer>
          {value => /*根据上下文  进行渲染相应内容*/}
        </Consumer>
      </div>
    )
  }
}
context 的另一种用法
// userContext.js
export default userContext
// C.js
import userContext from "./userContext"

export class C extends Component {
  static contextType = userContext
  render() {
    return (
      <div>
        {this.context}
      </div>
    )
  }
}
# 4. 表单
# 4.1 受控表单 (opens new window)
表单控件中的值由组件的 state 对象来管理,state对象中存储的值和表单控件中的值时同步状态的
class App extends Component {
  constructor () {
    this.state = { username: "" }
    this.nameChanged = this.nameChanged.bind(this)
  }

  nameChanged (e) {
    this.setState({username: e.target.value})
  }
  render() {
    return (
      <form>
        <p>{this.state.username}</p>
        <input type="text" value={this.state.username} onChange={this.nameChanged}/>
      </form>
    )
  }
}
# 4.2 非受控表单 (opens new window)
表单元素的值由 DOM 元素本身管理。
class App extends Component {
  constructor () {
    this.onSubmit = this.onSubmit.bind(this)
  }
  onSubmit(e) {
    console.log(this.username.value)
    e.preventDefault();
  }
  render(
    <form onSubmit={this.onSubmit}>
      <input type="text" ref={username => this.username = username}/>
    </form>
  )
}
# 5. 路由
url地址与组件之间的对应关系,访问不同的url地址显示不同的组件。
下载:npm install react-router-dom
# 5.1.1 路由基本使用
Router放置在最外层
Link创建链接
Route设置和匹配路由规则
<Route path="/index" component={Index}/>,访问index路径时,显示Index组件。
// App.js
import React from 'react';
import { BrowserRouter as Router, Route, Link } from 'react-router-dom';
function Index() {
	return <div>首页</div>;
}
function News() {
	return <div>新闻</div>;
}
function App() {
  return (
    <Router>
      <div>
        <Link to="/index">首页</Link>
        <Link to="/news">新闻</Link>
      </div>
      <div>
        <Route path="/index" component={Index}/>
        <Route path="/news" component={News}/>
      </div>
    </Router>
  );
}
# 5.1.2 路由嵌套
function News(props) {
  return (
    <div>
      <div>
        <Link to={`${props.match.url}/company`}>公司新闻</Link>
        <Link to={`${props.match.url}/industry`}>行业新闻</Link>
      </div>
      <div>
        <Route path={`${props.match.path}/company`} component={CompanyNews} />
        <Route path={`${props.match.path}/industry`} component={IndustryNews}/>
      </div>
    </div>
  );
}

function CompanyNews() {
	return <div>公司新闻</div>
}
function IndustryNews() {
	return <div>行业新闻</div>
}
# 5.1.3 路由传参
import url from 'url';
class News extends Component {
  constructor(props) {
    super(props);
    this.state = {
      list: [
        {id: 1, title: '新闻1'},
        {id: 2, title: '新闻2'},
      ]
    }
  }

  render() {
    return (
      <div>
        <div>新闻列表组件</div>
        <ul>
          this.state.list.map((item, index) => {
            return (
              <li key={index}>
                <Link to={`/detail?id=${item.id}`}>{item.title}</Link>
              </li>
            );
          })
        </ul>
      </div>
    );
  }
}

class Detail extends Component {
  constructor(props) {
    super(props);
  }
	const { query } = url.parse(this.props.location.search, true); // 参数为true,结果转换为对象
	console.log(query); // {id: 1}
  render() {
    return <div>新闻详情</div>
  }
}
# 5.1.4 路由重定向
import { Redirect } from 'react-router-dom';

class Login extends Component {
  render() {
    if (this.state.isLogin) {
      return <Redirect to="/"/>
    }
  }
}