# eslint-plugin-san (opens new window)
eslint-plugin-san (opens new window) 是专门为 san 制定的基于 eslint 的规则校验插件。我会从以下几个方面来介绍:
- eslint 使用及配置
- eslint-plugin-san 使用及配置
- 源码解析
- 如何创建自己的规则
- San-eslint-parser
- 如何调试
- 常见的 AST 节点类型
# eslint 使用及配置
安装:yarn add eslint
配置:eslint --init,此时会有一些命令行交互问题,按需回答即可,一般选用 Standard 规范,安装一些依赖之后,使用eslint foo.js检查目标文件即可。
// .eslintrc.js
module.exports = {
  env: {
    browser: true,
    es6: true
  },
  extends: [
    'standard'
  ],
  parser: "babel-eslint",
  parserOptions: {
    ecmaVersion: 6,
    sourceType: "module",
    ecmaFeature:{
			"jsx":true,
			"globalReturn":true,
			"impliedStrict":true,
		}
  },
  plugins: [
    'eslint-plugin-react',
    '@typescript-eslint'
  ],
  //
  rules: {
    'no-alert': "error"
  },
  globals: {
    "jQuery": "readonly"
  }
}
- env:标记运行环境,可选 browser/node/commonjs 等,可以同时使用
browser: true:启用 browser 特性:代码中可以使用 document, window 全局对象es6: true:启用 ES6 特性
- extends:扩展,集成配置方案
- parser:指定语法分析器,例如
babel-parser,也可以选用其他的如:eslint-san-parser - parserOptions:默认的 parser,只转换js且默认支持ES5的语法,可以通过 parserOptions 传递选项。
ecmaVersion: 6:ecmaVersion 可以开启更高 ES 版本的校验sourceType: "module":可以设置为 "script",如果使用 ESModule 可以设置为 "module"ecmaFeature:想使用额外的语言特性"jsx":true: 启用jsx
- plugins:插件,例如想增加校验 react, ts 的规则,可配置如下
eslint-plugin-react@typescript-eslint
- rules:可以自定义配置校验规则
'no-alert': "error": 有 off/warn/error 选项
- globals:声明可以使用的全局成员
# plugins、extends有什么区别?
| extends | plugin | |
|---|---|---|
| 命名 | eslint-config-或 @scope/eslint-config 或 @scope/eslint-config-myconfig | eslint-plugin-<plugin-name> 或@scope/eslint-plugin-<plugin-name> |
| 用途 | 扩展,集成一个个配置方案的最佳实践,即别人配置好的.exlintrc.js,里面不只有 rules,比如可能有 env,global 配置 | 插件,一般是一堆自定义的规则的集合,加载插件即是引入了额外的自定义规则。也可能会包含其他配置项。 |
- plugin 插件主要涉及自定义规则的具体实现,同时还能够提供配置
- extend 配置主要涉及规则的具体配置
# eslint-plugin-san 使用及配置
eslint-plugin-san (opens new window) 本质上是 eslint 的一个插件,类似于 eslint-plugin-vue (opens new window),自定义了 san 的检验规则。
# 如何配置
yarn add -D eslint eslint-plugin-san
用extends方式可以配置想要的规则集,例如plugin:san/recommended,recommended内部已经在rules配置好了相应的规则。如果配置到plugins中,还需在rules中自己添加规则。
// .eslintrc.js
module.exports = {
  extends: [
    // add more generic rulesets here, such as:
    // 'eslint:recommended',
    'plugin:san/recommended'
  ],
  rules: {
    // override/add rules settings here, such as:
    // 'san/no-unused-vars': 'error'
  }
}
# 如何检测
eslint --ext .js,.san ./src
--ext命令可以明确校验文件扩展:.js和.san文件都可以校验。
# 利用 husky 和 lint-staged 构建工作流
- husky:git hooks 工具,可以配置在 commit 之前执行检查。
- lint-staged:只对暂存区的文件进行操作。
"lint-staged": {
  "**/*.{js,jsx,san}": "eslint --ext .js,.san ./src"
},
"husky": {
  "hooks": {
    "pre-commit": "lint-staged"
  }
},
# 新版 husky 配置
新版的 husky 取消了在 package.json 中配置的方式,可以使用 husky install 来创建 .husky 目录,我们不妨写个脚本:
# install-husky.sh
#!/bin/sh

npx husky install

# 删除已有的 git hooks
rm .husky/commit-msg
rm .husky/pre-commit

# 添加 pre-commit hook
npx husky add .husky/pre-commit "npx --no-install lint-staged"

# commit-msg hook 添加 commitlint 调用
npx husky add .husky/commit-msg 'npx --no-install commitlint --edit "$1"'
在项目中执行这个脚本生成.husky目录,里面分别包含 pre-commit 和 commit-msg。在每次 commit 时:
- 运行 lint-staged ,可以配置来同时校验 eslint 和 stylelint
"scripts": {
  "lint-staged": "lint-staged"
},
"lint-staged": {
  "**/*.{js,jsx,san}": "eslint",
  "**/*.{css,less}": "stylelint"
},
- 运行 commitlint (opens new window),需要在项目中创建
commitlint.config.js进行配置
这样就完成了使用 husky 来集成 eslint & stylelint & commitlint。
# 源码解析
源码地址:https://github.com/ecomfe/eslint-plugin-san
首先解释一下plugin:san/recommended的含义,eslint-plugin-san的规范 (opens new window)分为四种:
- 基础(base)
- 必要(essential)
- 强烈推荐(strongly-recommended)
- 推荐(recommended)
由前到后,后面的规则范围会涵盖前面的,例如recommended包含strongly-recommended的规则,而strongly-recommended又包含essential的规则。
# 目录结构
├── README.md
├── lib
│   ├── configs
│   │   ├── base.js
│   │   ├── essential.js
│   │   ├── no-layout-rules.js
│   │   ├── recommended.js
│   │   └── strongly-recommended.js
│   ├── index.js
│   ├── processor.js
│   ├── rules
│   │   ├── attribute-hyphenation.js
│   │   ├── attributes-order.js
│   │   ├── boolean-value.js
│   │   ├── ...
│   │   └── valid-template-root.js
│   └── utils
│       └── index.js
└── package.json
index.js中包含着插件默认导出的对象:
module.exports = {
    rules: extend(rules), // 校验规则
    configs: { // 配置不同的规范,通过 eslint-plugin-san/recommended 来使用
        base: require('./configs/base'),
        essential: require('./configs/essential'),
        recommended: require('./configs/recommended'),
        strongly-recommended: require('./configs/strongly-recommended')
    },
    processors: {
        '.san': require('./processor'),
        '.ts': require('./processor'),
        '.js': require('./processor')
    }
};
# rules (opens new window)
在 ESLint 中,插件可以暴露额外的规则以供使用。为此,插件必须输出一个 rules对象,包含规则 ID 和对应规则的一个键值对。例如:
rules: {
  "no-dupe-keys": {
    create: function (context) {
      // rule implementation ...
    }
  }
}
# config (opens new window)
config目录下主要有以下几项:
- base.js
- essential.js
- strongly-recommended.js
- recommended.js
// base.js:包含基础配置项
module.exports = {
    // 在这里已经配置了 parser,所以项目中的 ..eslintrc.js 不用去配置,作用是解析代码生成 AST
    parser: require.resolve('san-eslint-parser'),
    parserOptions: {
        ecmaVersion: 2020,
        sourceType: 'module'
    },
    env: {
        browser: true,
        es6: true
    },
    plugins: ['san'], // 插件 eslint-plugin-san,san是简写
    rules: {
        'san/comment-directive': 'error'
    }
};

// essential.js: 就是在 base.js 的基础上添加一些规则
module.exports = {
    extends: require.resolve('./base'),
    rules: {
        'san/valid-components-name': 'error',
        'san/custom-event-name-casing': 'error',
        // ...
    }
};

// strongly-recommended.js: 就是在 essential.js 基础上添加一些规则
module.exports = {
    extends: require.resolve('./essential'),
    rules: {
        'san/boolean-value': 'warn',
        'san/attribute-hyphenation': 'warn',
        // ...
    }
};
# processor (opens new window)
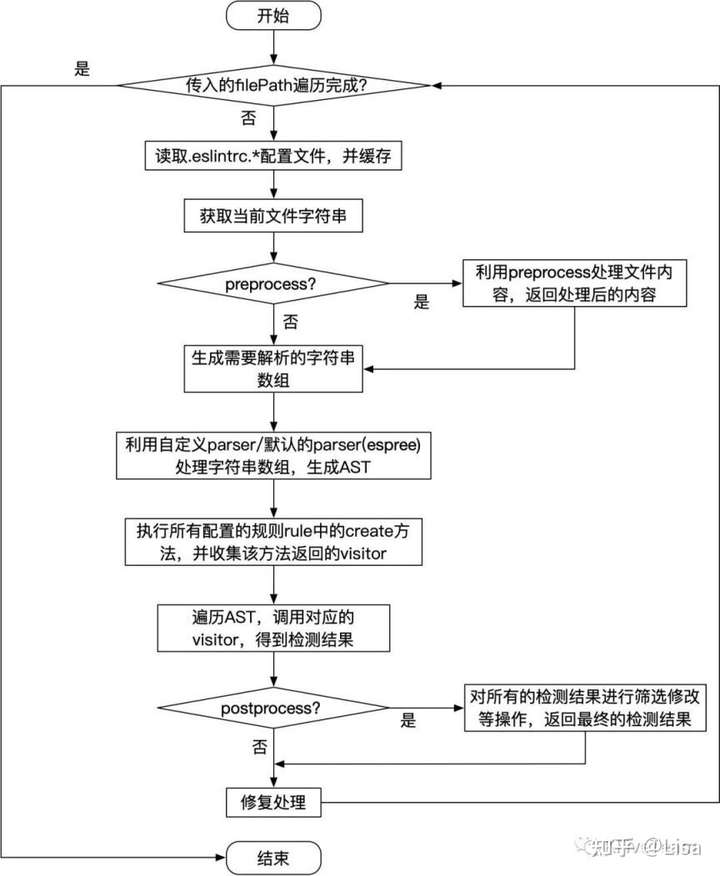
处理器,在 parser 之前和最后输出结果之前可以利用 processor 作一些额外处理。
创建一个处理器,从你的模块中输出的对象必须符合以下接口:
processors: {
  ".san": {
    preprocess: function(text, filename) {
      return [string];
    },

    postprocess: function(messages, filename) {
			// ...
			return messages[0];
		},

    supportsAutofix: true
  }
}
下图可以看到整体流程以及 preprocess和postcess 的触发时机。

# 如何创建规自己的规则 (opens new window)
规则的基本格式:
"use strict";

module.exports = {
    meta: {
        type: "suggestion",
        docs: {
            description: "disallow unnecessary semicolons",
            category: "Possible Errors",
            recommended: true,
            url: "https://eslint.org/docs/rules/no-extra-semi"
        },
        fixable: "code",
        schema: []
    },
    create: function(context) {
        return {
            // 语法节点:import
            ImportDeclaration(node) {
              context.report({
                node: node,
                messageId: "readonlyMember",
                data: {name: 'xxx'}
              });
            },

            // 选择器:参数 > 3个的函数节点
          	"FunctionDeclaration[params.length>3]": function(functionDeclarationNode) {
              // ...your logic here
            }

            // 事件
          	"onCodePathStart": function(codePath, node) {
                // do something with codePath
            },
        };
    }
};
meta:包含规则的元数据:type(string) 指示规则的类型,值为"problem"、"suggestion"或"layout"docs(object) 对 ESLint 核心规则来说是必需的description(字符串) 提供规则的简短描述category(string) 指定规则处于的分类recommended(boolean) 配置文件 (opens new window)中的"extends": "eslint:recommended"属性是否启用该规则url(string) 指定可以访问完整文档的 url。
scheme:用来描述一个规则的选项,ESLint 会用它来验证配置中的选项是否有效。在传入到规则中之前,避免 context.options 出现无效或非法输入。
create(function) 返回一个对象,其中包含了 ESLint 在遍历 JavaScript 代码的抽象语法树 AST (ESTree (opens new window) 定义的 AST) 时,用来访问节点的方法。- 如果一个 key 是个节点类型或 selector (opens new window),在 向下 遍历树时,ESLint 调用 visitor 函数
- 如果一个 key 是个节点类型或 selector (opens new window),并带有
:exit,在遍历退出该节点时(DFS),ESLint 调用 visitor 函数 - 如果一个 key 是个事件名字,ESLint 为代码路径分析 (opens new window)调用 handler 函数
TIP
建议仔细看下这两篇文档,解释了什么是选择器和路径分析 selector (opens new window) 代码路径分析 (opens new window)
# san-eslint-parser
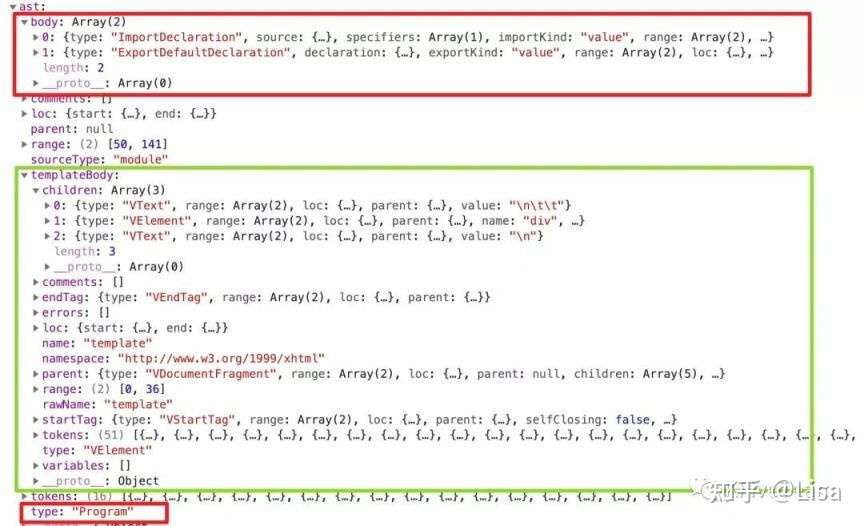
san-eslint-parser 会将我们.san 的文件内容利用分成三个 block,其中利用 parserOptions.parser 指定的解析器来处理 script 部分的内容,script中如果是 JavaScript 代码则 parserOPtions.parser 为 @babel/eslint-parser,如果是 Typescript 代码则为 @typescript-eslint/parser。style 部分不会处理,template 部分当作 HTML 来解析。

上图所示为自定义 parser 生成的 AST,根节点的 type 为 Program,根节点的 body 属性存储了 script 代码的 ast,根节点上的 templateBody 为 template 部分的 ast。由于 ESlint 只会遍历根节点以及 body 上的节点,因此如果我们想为 templateBody 注册 visitor,那么可以通过 services 来实现。
services:自定义 parser 为 rule 提供的服务,每条规则可以通过 context.parserServices 访问到
san-eslint-parser 会在 services 属性上定义 defineTemplateBodyVisitor 方法:
let emitter = null; // 发布订阅器
function defineTemplateBodyVisitor(templateBodyVisitor) {
    let scriptVisitor = {};
    if (!emitter) {
        emitter = new EventEmitter();
        scriptVisitor["Program"] = node => {
            traverseNodes(rootAST.templateBody)
        };
    }
    for (const selector of Object.keys(templateBodyVisitor)) {
        emitter.on(selector, templateBodyVisitor[selector]);
    }
    return scriptVisitor;
}
该方法主要完成了两部分的工作:
- 收集每条 rule 中针对 templateBody 的 visitor:该方法接收的参数为 templateBodyVisitor,该对象存储了所有针对 templateBody 的 visitor,这些 visitor 会注册到自定义 parser 内部的发布订阅器上。
- 返回一个针对 script 对应的 AST 的 visitor:该 visitor 的 type 为 Program,根据上文中 ESlint 工作原理一节,我们可以知道,ESlint 在遍历 AST 的过程中,当遇到类型为 Program 的根节点时,会执行该 visitor,并且该 visitor 会调用自定义 parser 内部方法对 templateBody 存储的 AST 进行遍历。
因此,我们可以利用上述方法在每条 rule 中编写相关的 visitor 来处理 templateBody 中不同 type 类型语法节点,如下代码所示:
module.exports = {
    meta: {...},
    create(context) {
        return context.parserServices.defineTemplateBodyVisitor(context, {
            'VElement'(node) {
                // do something
            },
            'VText'(node) {
                // do something
            }
        });
    }
};
# 如何调试
- 下载
eslint-plugin-san源码
git clone https://github.com/ecomfe/eslint-plugin-san.git
- 本地新建个项目,配置
.eslintrc.js和package.json脚本,然后进行正常安装依赖eslint 和 eslint-plugin-san。
// eslintrc.js
module.exports = {
  extends: [
    'plugin:san/recommended'
  ],
  rules: {}
}

// package.json
{
    "scripts": {
      "test": "echo \"Error: no test specified\" && exit 1",
        "dev": "eslint ./test.san"
    },
    "dependencies": {
      "eslint": "^7.32.0",
      "eslint-plugin-san": "^1.0.2"
    }
}
- npm link
调试源码可以从 node_modules 中去直接修改 eslint-plugin-san,但是这样做不是在源代码上改的,没有改动提示,如果想提交新的改动会很麻烦。
所以本地开发 npm 模块时一般要 npm link 命令,他的主要作用是,将本地下载好的包链接到项目中的
node_modules中去,这样直接在源码包中修改即可。
# 进入 eslint-plugin-san 中
npm link
# 进入项目中
npm link eslint-plugin-san
# 运行 node --inspect-brk 命令
node --inspect-brk index.js
# 打开 chrome 输入 chrome://inspect 打开调试面板
修改package.json中的脚本
其实上面的
eslint ./test.san中的eslint就是./node_modules/.bin/eslint的简写,这里由于前面加了node --inspect-brk,所以这里不能简写了,要把路径写全。
{
  "scripts": {
    "test": "echo \"Error: no test specified\" && exit 1",
    "dev": "node --inspect-brk ./node_modules/.bin/eslint ./test.san"
  }
}
- 下载 eslint 插件 (opens new window)
- 配置 settings.json
# 常见的 AST 节点类型 (opens new window)
| 类型原名称 | 中文名称 | 描述 |
|---|---|---|
| Program | 程序主体 | 整段代码的主体 |
| VariableDeclaration | 变量声明 | 声明一个变量,例如 var let const |
| FunctionDeclaration | 函数声明 | 声明一个函数,例如 function |
| ExpressionStatement | 表达式语句 | 通常是调用一个函数,例如 console.log() |
| ImportDeclaration | Import 声明 | import |
| ExportDefaultDeclaration | Export 声明 | export default |
| BlockStatement | 块语句 | 包裹在 {} 块内的代码,例如 if (condition){var a = 1;} |
| Identifier | 标识符 | 标识,例如声明变量时 var identi = 5 中的 identi |
| CallExpression | 调用表达式 | 通常指调用一个函数,例如 console.log() |
| BinaryExpression | 二进制表达式 | 通常指运算,例如 1+2 |
| MemberExpression | 成员表达式 | 通常指调用对象的成员,例如 console 对象的 log 成员 |
| NewExpression | New 表达式 | 通常指使用 New 关键词 |
| AssignmentExpression | 赋值表达式 | 通常指将函数的返回值赋值给变量 |
| UpdateExpression | 更新表达式 | 通常指更新成员值,例如 i++ |
| ObjectExpression | 对象表达式 | {a: 1} |
| Literal | 字面量 | 字面量 |
| BooleanLiteral | 布尔型字面量 | 布尔值,例如 true false |
| NumericLiteral | 数字型字面量 | 数字,例如 100 |
| StringLiteral | 字符型字面量 | 字符串,例如 vansenb |
| SwitchCase | Case 语句 | 通常指 Switch 语句中的 Case |
← san框架 san-composition →